
Have you just seen a 3d photo on Facebook and you also want to try that? And the problem is you don’t know how to use this new feature.
But don’t you worry, I will give you the easy & quick steps to upload 3d photo on Facebook.
This new feature seems very cool and trending nowadays. Most of us want to try at least once. Facebook called it a 3d photo but it’s not actually 3d. It is called as 3d because when you scroll down there’s moving animation in the photo which makes it seems as 3d.
Well, it’s cool to see 3d photos instead of static photos. And the good thing is that you can make any photo as 3d photo on Facebook. But one thing you need to keep in mind is that this feature works when you are posting any kind of picture.
This modern world is moving to the virtual world of technology. If you will observe people are connecting virtually. Devices and gadgets are made to give you a virtual feeling of the real world.
This new tech world is moving to Virtual reality, and this new 3d photo on Facebook is one of the steps towards it.
You are here at the right place because we will cover all the things in details but in a simpler way that you don’t need to go anywhere.
How to upload 3d photo on Facebook android
It’s very simple to upload 3D photo on Facebook from smartphones. Since, this feature is availaible on Facebook app for Android and iOS devices. So you don’t have to do anything. Just capture the photo and upload it, rest of the processing part will be done by facebook.
Step 1: Make sure that you have most recent version of Facebook.
If not, update from here
Step 2: Open Facebook. Go to the top of homepage.
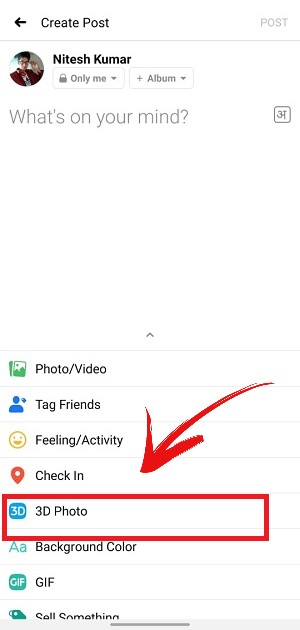
Step 3: ‘Tap on ‘ Write something here‘.
A new interface will be opened and yow will get something to write.

Step 4: ‘Tap on’ 3D photo‘ present at the bottom.
Step 5: Select the photo from your gallery.
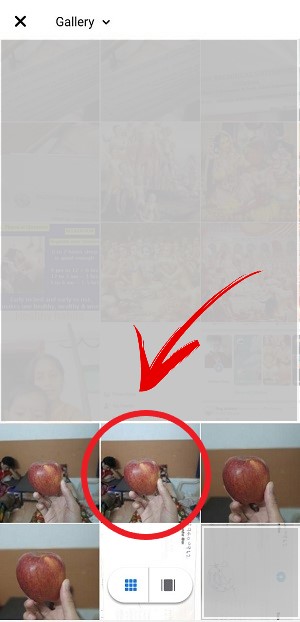
Then it will start converting image into 3D, processing will take few seconds
Step 6: Now you write any caption with the 3D photo if you want.
After that tap on ‘Post’ present at top right.
? Tips:
1. To see the effect. , rotate your phone left and right. Move the phone to look around in 3D.
2. Capture the photo such that objects inside it has a different layer. There should be depth in the image which means objects inside it should be at different distances from you.
3. Try to avoid capturing long, thin objects in the foreground because if not it will be difficult for the software to detect the thin layers. Thin and sharp layers are hard to be identified.
4. Avoid scenes with reflections and transparent objects.
5. Avoid scenes where the foreground and background have similar colours.
6. Avoid overexposed image because it can lead to poor 3D effects.
How to upload 3d photo on Facebook from PC
Uploading 3d photo on Facebook from pc is a bit tricky. You have to manually make a depth image when creating a 3d image in PC, which means you have to make a depth image from yourself by using some photo editing software like photoshop.
The good thing is that, since you are uploading photo on Facebook, you don’t need any extra tool/software to compile the normal image & it’s depth image.
Those who don’t know what is depth image. In simpler words, it is assigning z-axis to the image. The normal image which we see is in 2D has only two axes. But when we are working on a 3D image, we have to focus on the depth of the image. That means different layers in the image should be at a successive distance from you.
So follow the below 4 steps to upload 3D photo on Facebook from PC:-
Step 1: Capture or select a suitable photo.
Choose or click the image smartly which has depth. You will have more 3D effect if objects placed in image at different distance from you.
Try to have image whose size is 3024 × 4032 px (portrait) or 4032 × 3024 px (landscape)
Step 2: Create a depth map for your selected image.
You can create a depth map by using Adobe Photoshop or with some online tools. If you don’t know stay tuned, we will discussed in the next article.
Step 3: Put ‘_depth’ at the end of file name of Depth map .
File name of Depth map should be same as of image but additionally it should have ‘_depth’ appended at the end.
For eg. If file name of a image is ‘apple.png’ then it depth map should be saved as ‘apple_depth.png’
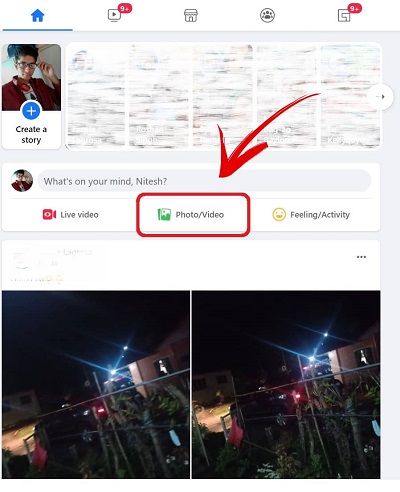
Step 4: Now, go to facebook.com on your PC.
Click on Photo/Video right below ‘What’s on your mind’.
Step 5: Now upload both files simultaneously (depth map and image) that you made in Step 3. After that publish your post.
And finally, your 3d photo will be created and you can drag your mouse to see the effect.
Final Words
So you have learnt to upload 3d photo from both smartphones as well as pc. If you are doing it for the first time, then you should first try to post privately instead to the public to test it.
The main trick is to create depth map of image. If you don’t know how to make depth map, stay tuned for the next article. I will cover creating depth map through Photoshop.
IF you like the article, please share it with your friends.?
Leave a Reply